New Post Caps / Deck Lights / Deck Lighting in Hermosa Beach
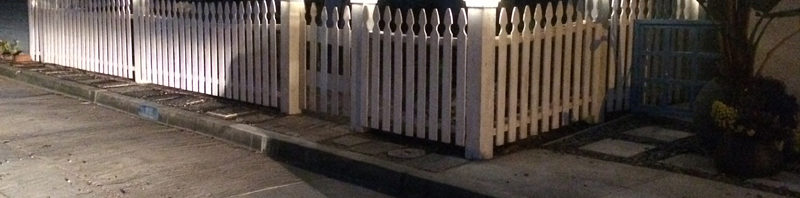
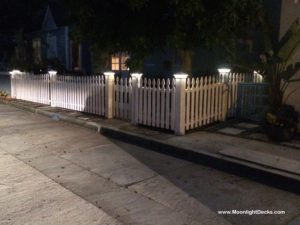
Here’s a couple pictures of our lighted post caps on a fence in Hermosa Beach. They used the white post caps with 6″ base.
Looks great! Check us out at www.MoonlightDecks.com

Deck Builder in Overland Park | Leawood | Olathe | Lenexa
Here’s a couple pictures of our lighted post caps on a fence in Hermosa Beach. They used the white post caps with 6″ base.
Looks great! Check us out at www.MoonlightDecks.com
We installed our smooth black wrinkle lighted post caps / deck lights on this new cedar deck built by All Weather Decks in Overland Park, KS.
The lighted post caps are a great match to the black metal spindles. They will provide excellent light on the stairs and deck. Not only that, they will also protect the posts from weathering, rotting, and cracking.
If you are building a new wood deck or already have one, you should definitely consider adding our lighted post caps. Give us a call or order online anytime!
Click on any of the images below to see a larger version.


I finally figured out how to take night time deck lighting pictures! Our deck lights look so good!
These pictures were taken at about 10 pm when it was really dark out. Enjoy!


Fence Post Lighting

Fence Post Lighting in Overland Park, KS
The fence lighting around this patio and privacy fence feature the copper vein color post caps from Moonlight Decks. The deck lights around the patio have double the glass to allow more light out.
This project started out as a small landscape lighting job in Overland Park, KS. But when the customer saw what she could do with the lighting effects for her backyard with our post caps and deck lights, she loved the idea.

The deck lights on the fence really add a nice ambiance to the sitting area and give a sense of security for the back yard at night.

Here are a few day shots followed by some decent night shots too.
If you would like your back yard to become a nice summer evening retreat, visit www.MoonlightDecks.com to see the many different styles of lights we have for your deck.

Scroll down to see the lights as night falls.


Many of these lights can also be seen on our Custom deck lights page.
Thanks for visiting!
Our lights are made in America!
Keep it Local!
Hey! Deck Lights are great in the snow too!
Check out these cool pics.

I’ve had these lights on my deck since 2004 now. They’ve been through all kinds of Kansas weather. And they are still going strong.
That’s because they are hand crafted and Made in America!

If you want some really cool deck lights for your deck, head over to www.MoonlightDecks.com and get in touch with Steve Hodes Jr. You will not regret it.

It was a cold day for deck lighting in Overland Park, Kansas. But it was a good day to put the finishing touches on this newly finished deck.
We used our Smooth Roman Bronze low voltage lighted post caps with triple glass on this job.
The extra glass allows more light to come out, which helps to provide that extra light when they are entertaining on the deck at night.

The roman bronze color is kind of a chocolatey brown color that was matched from the darkest part of our hammered cast bronze lighted post caps. It’s a very nice contrasting color against the white railing.

We’ve been nominated as one of the best businesses in kansas city!
On Kansas City’s A-List, we are nominated under the Home and Garden -> Accessories
Please come check it out and vote for us as the best!
http://kmbc.cityvoter.com/contests/home-and-garden/4731/outdoor-living/accessories
Thank You!
Steve
Lighting Your deck could save you hundreds!!

Yes that is right. You can save money by installing deck lighting. Let me just tell you a quick personal story about how I could have saved around $200 in just one night.
Being married with two kids, we don’t get to go out that often. But one night last summer we went out with another couple for some dinner and drinks. We didn’t go anywhere too fancy or too expensive.
Let’s just see where my money went:
$5.25 beers, $9.75 wine and cocktails for the girls, $10.00 appetizers, $20 – $25 dinner x 2 for my wife and I, an $8.00 shared desert, and a $10 per hour babysitter. All told I spent nearly $200.

And what was I thinking the whole time I was out? Well in between waiting forever for our expensive drinks, getting bumped into by the wait staff and other pushy customers, and dining on food we could have easily prepared just as well at home, I was thinking how much better off we would have been by entertaining our friends at our house. Let’s see how our experience would have been different…
It was a nice cool night outside. We have 11 lighted post caps on our deck which provide a really nice ambient light. It is not too bright and not so dark that we can’t see each other. It’s actually kind of romantic. And it is much better than using the swarm inducing flood lights or smelly citronella candles. The low voltage lights don’t really attract any bugs at all.

There certainly wouldn’t have been any waiting at the bar for expensive drinks and there wouldn’t have been anyone pushing past us other than the kids. There would have been no babysitter fees for either couple. We could have had an entire bottle of wine for the same price as one glass at the restaurant. We could have had an entire six-pack of beer for the same price as one beer at the restaurant. We could have had steak or chicken on the grill for all four of us AND our kids for the same price as my dinner at the restaurant.

All in all we probably could have easily saved $200 or more between the two couples.
Now I love to go out as much as anyone. But if you are looking to save a few dollars and bring the party back to your house, why not enjoy the company of friends out on your lighted deck?
My lighted post caps are certainly not for everyone and they might not even be the right solution for you. But even if they aren’t for you, I should be able to help you out with another suggestion. Take a look at my website, www.MoonlightDecks.com, and give me a call if you have any questions regarding lighting options for your deck.
Thanks!
Steve
This is a photo tutorial on how to install your low voltage deck lighting system from Moonlight Decks.
[slideshare id=980793&doc=howtoinstalllowvoltagedecklights-1233596593329979-3]
You can see our video tutorials on how to install low voltage deck lights here.
Deck Light Installations
Cool Idea for your Lighted Post Caps and Deck Lights
I just noticed at Home Depot that they have different colored wedge based bulbs that will fit the sockets that I use. I did see red and green, so if you are interested in a little festive holiday lighting on your deck, it would only take about a minute or two to change out the regular bulbs to these holiday color bulbs. And they were cheap too! I think they were around $5 for a package of 3.
How much does it cost?
90% of our clients’ installations range from $1,000-$3,000. This includes the fixtures, transformer, labor, and materials. Estimate your deck
How long does it take to install?
Most systems take 3 – 6 hours to install.
Will installation damage my deck, or yard and landscape?
 Post cap installation – the wiring is run underneath the hand rail. We try to hide as much of the wiring as possible. Small holes are drilled into the post from the sides underneath the handrail. A 1 inch diameter hole is drilled into the top of the post approximately 6 inches deep, or however deep you need to go to reach below the handrail, to accomodate the wiring of the light kit. The lights are then wired and the post cap sits on top of the post and is secured with small screws.
Of course if you only want the caps without the lighting system then the only damage to the deck is the small attachment screws.
Doing it yourself?
Installation tips –
Plan out your wiring before you start.
I usually use a 300 watt transformer from Lowe’s or Home Depot. They are the easiest to install and maintain. If you have more than 14 lights you will need another transformer or one that can handle more watts.
I usually use a 1” auger bit (approximately 15” long) to drill down just off center of the top of the post to just below the handrail. Draw 2 lines from corner to corner making an “X” on the top of the post. This is where you need to center the bulb. So when you drill down through the top of the post in order to run your wire up through it, drill just slightly off center to allow for the placement of the bulb.
Then I use a ½” bit to drill at an angle from underneath the handrail up into the 1” hole. I also use a 1 3/4″ Forstner bit drilled down about an inch over the existing 1″ auger bit hole to give me some room to make my connections and stuff them below the base of the post cap. Then blow out the sawdust as best as possible.
Then I usually pick a post that is close to the house and run my low voltage 16 gauge wire up that post, then under the handrail, and up through the ½” hole, and finally make my connections to the sockets.
I run the wire from post to post underneath the handrail making my connections to the sockets inside each post. Staple the wire up to the underneath side of the handrail. Be sure not to staple through the wire! Make sure the staple goes cleanly around the wire.
*If you are building your deck, another great way to wire it is to take off the hand rail and router the top 2×4 to lay your wire into. Then drill your holes up into the post. This way, you definitely won’t see any wire. Just be careful when you put the handrail back on not to screw into your wire.
*If you want to hide the wire going up the post to your caps, you can use a router again and notch out a spot for the wire up the post. Then add a decorative piece of wood to cover it up.
Make your connections to the light socket. Use the black wood screw to attach the light sockets to the top of the post, centered so that the cap fits over the bulb. The bulb and socket need to be at the very center of the post. Again, the best way to do this is to draw 2 lines from corner to corner making an “X” on the top of the post. This is where you need to center the bulb. So when you drill down through the top of the post in order to run your wire up through it, drill just slightly off center to allow for the placement of the bulb.
Finally, use the wood screws with the black pan heads to screw the base into the post or check out some different screw colors at your local hardware store.
FYI – The smooth post caps have a slightly lower profile. So you may need to recess the socket about a 1/2 Inch into the top of the post if you don’t get it perfectly centered.
How do I control the lights?
A timer, located inside the transformer, controls the system. It is set to your desired on/off times. You can also use a photo cell with the transformer.
If you live in the Kansas City area, and would like to see the post caps in person, please call me for a free estimate.
If you are not comfortable wiring up your deck, consult an electrician or landscape lighting professional.
Moonlight Decks LLC will not be held responsible for any faulty wiring that causes a fire or other damage.
Low Voltage Lighted Post Cap Slideshow
[slideshare id=956025&doc=decklightingslideshow-1233029966915400-3&w=425]
The images from the slideshow above are also available on my website, www.moonlightdecks.com. You can see much bigger images on our Deck Lighting Photo Gallery. Or this deck lighting photo gallery.